
With the fall season comes various craft ideas to get the imagination flowing. To assist families with craft ideas that can be done at home, especially for those taking part in remote learning, here is a craft idea submitted by a local art educator:
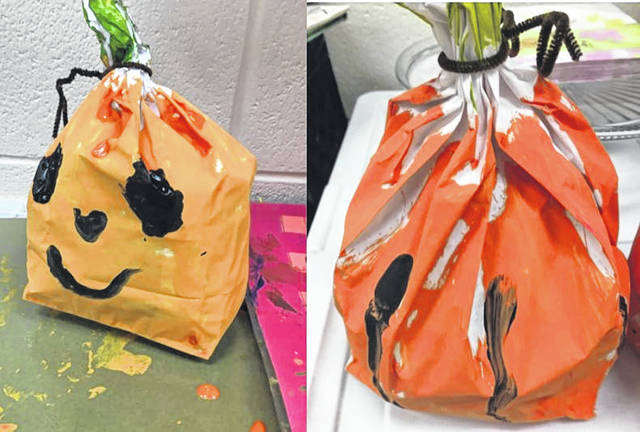
Paper Bag Pumpkin
This project is done with students in kindergarten and older.
Supplies:
-smaller paper sack — like a lunch sack
-paint — primary colors (red, yellow and blue), black (black is a neutral color)
-paintbrushes — one smaller and another medium or larger-sized
-string or pipe cleaner
-newspaper, junk mail or scrap paper
-easy to clean work area
Steps
Before making the “Paper Bag Pumpkin,” watch the fun YouTube video “Five Little Pumpkins Sitting On a Gate,” and try to learn it’s poem/rhyme: www.youtube.com/watch?v=cm1qvX1ygOo.
Your paper bag pumpkin will be a 3-D sculpture. Let’s review what the “D” means in 3-D! The “D” means dimensional! You will make a sculpture that can be measured in three ways!
Height — how tall is it? Measure from bottom to top (sometimes this is called the length). This measurement is the first dimension.
Width — How wide is it left-to-right? This measurement is the second dimension.
Depth — Measure front-to-back. This measurement is the third dimension.
Now, open the bag. Crumple newspapers, scrap paper or junk mail into balls. You will need two or more balls until the bag is filled a little over halfway.
Once filled a little over halfway, close the bag at the top and twist it a little to make the stem. Then, tie the stem with a string or pipe cleaner.
Mix orange paint to paint the bag. To make orange, use a larger amount of yellow and a little bit of red. Holding the stem, paint the bag using the medium/larger brush all the way around. Then clean your brush.
Mix green and/ or brown paint. To make green, mix yellow with a tiny bit of blue. To make brown, use the green mixture and add some of the orange paint you already made to it). Now paint the stem!
Next, add details using black and a smaller paint brush. It can be a jack-o-lantern face, pumpkin lines, or something you come up with!
Once the details are complete, clean up your brushes and your painting area. Let the “Paper Bag Pumpkin” dry overnight.
Things to think about:
-Do I like my “Paper Bag Pumpkin?”
-Did I make any mistakes while making my pumpkin? How did I work with that?
-What if I made “5” Pumpkins like the ones in the Rhyme? How would each pumpkin look?

